White Chocolate Raspberry Cheesecake
Cheesecake. Yum.


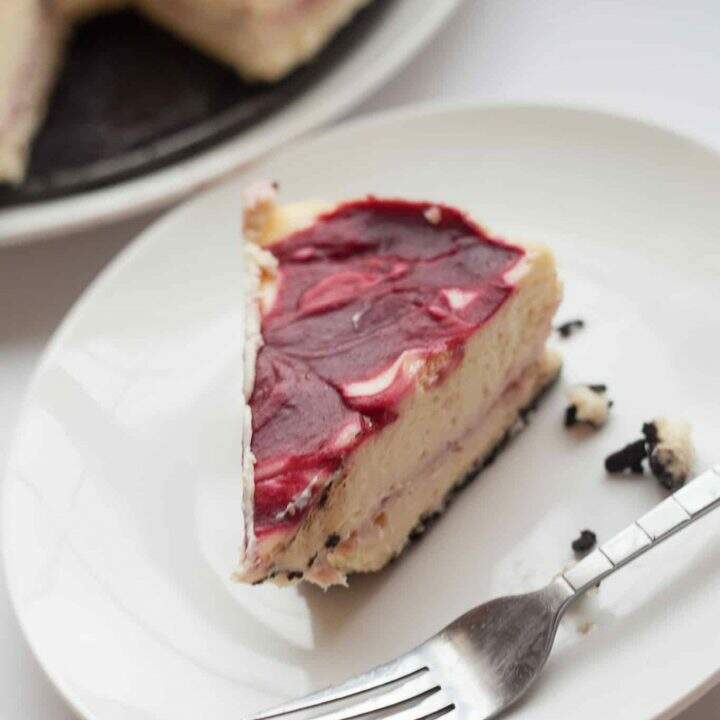
White Chocolate Raspberry Cheesecake with a thick buttery oreo crust. Double Yum.
Seriously though. I absolutely love cheesecake. When I was a kid I didn’t really like cake (don’t worry, I’ve grown up and changed my ways. Find evidence here.) Anyway, I remember my mom getting creative with birthday items for me to blow candles out of that weren’t cake. Rice crispies were often a solution, but I also remember asking my mom if I could have cheesecake for my birthday, and she obliged with a box of jello cheesecake, and that was totally awesome. 
This white chocolate raspberry cheesecake is a bit of a step up from the box. The ribbons of tart raspberry sauce drizzled throughout the rich and creamy cheesecake that is the perfect texture and just the right sweetness make this dessert a real treat. Doesn’t it look delectable.
I have a question. What is it about baking cheesecake that is so intimidating!? If I were to say that I had one food “specialty” as in a food that I am asked to make often and that I tend to get compliments on it would be cheesecake. People are always SO impressed if you make your own cheesecake, but I have a confession to make. I don’t think it’s all that difficult. Sure, I’ve had a cracked cheesecake or two, but I don’t think I have ever had a cheesecake that didn’t taste wonderful. I mastered cheesecake before I mastered chocolate chip cookies (something that EVERYONE makes and something that I am still working on perfecting).

Anyway, are you tired of me gloating about how awesome I am at cheesecake!? That’s not the point, really, honest, I’m not looking for validation here (Although, while we’re on the subject, give me some wouldya? I love comments ;)) I am just trying to convince you that it’s really not tough to make cheesecake at home….And if you do, everyone will be so impressed and your friends and family will worship your domestic goddess ways forever and will be falling at your feet begging for more. Okay, that might be a bit dramatic, but you catch my drift. I am going to try to give you as many details of how to make this without failing…and like I said before, even if you “fail” it’s probably still going to taste totally awesome, so no sweat. Looks aren’t everything.
Go ahead and preheat your oven to 325 degrees.
On to the white chocolate raspberry cheesecake. First things first. The crust. This part is pretty foolproof. Crushed up oreos. Butter. That’s it. I like to take the cream out of my oreos and then crush them in a food processor until they are nice and fine. You could also put them in a gallon bag and crush them with a rolling pin if you don’t have a food processor, but really, you should just get a food processor because they are awesome. Press the oreos into the bottom of a springform pan. The pan is not optional. I used to make cheesecakes in storebought crusts all the time, and they cracked. Every. Single. Time. You can get a springform pan for less than ten dollars and it is so worth it for any cheesecake recipe. Sales pitch over.
After you’ve made your crust wrap the pan in a double layer of aluminum foil, this will be important later in the water-bath step.

Next, the raspberry sauce. Making the sauce is pretty straight-forward, but after it’s all done you’ll want to get the seeds out. This part is kind of a pain, but really not too difficult. Simply put the sauce through a fine mesh strainer over a bowl to catch your beautiful sauce. It really does look so lovely when all of the seeds are out of it. I like to push the sauce through with the bottom of a glass to get the most sauce out. You may not use all of the sauce in your cheesecake, if you don’t, you can save the sauce in the fridge for a few days and have it on pancakes or my personal favorite, vanilla ice cream.
Filling. Now the filling is one of the trickier parts of this, but as long as you do exactly what I say you’ll be just fine (wow, threatening much!? sorry. I will work on toning down the threats…) First things first, the cream cheese. It MUST be room temperature and SOFT. I usually leave mine out overnight and it works great. Leave it out at least a few hours before you plan to make your cheesecake. If you don’t use room temperature cream cheese your cheesecake will be hard to mix and lumpy.
The first thing you will do with your batter is beat the cream cheese alone until it’s smooth. Then add the sugar and beat until very smooth. After this point, you won’t want to overbeat the batter which can add to much air to your batter and make the texture less pleasing so it’s important for the batter to be smooth before you start adding eggs. Add the eggs one at a time, scraping down the sides as needed.
This recipe includes cornstarch and lemon juice. I like the slightly tart flavor the lemon juice adds. The cornstarch helps prevent the cheesecake from cracking. In fact, I have heard that if you use cornstarch or flour in your cheesecake, you don’t need a water bath. I like to REALLY make sure that my cake is not going to crack, so I always do a waterbath anyway…but if you’re feeling risky, skip it. Let me know how it works out for you.
I melted my white chocolate in the microwave by melting at 50% power for 30 second intervals, stirring between each interval until it was silky and smooth.


After your crust, batter, and raspberry sauce are completed it’s time to assemble your cheesecake. Start by pouring half of the batter on top of the prepared oreo crust. Next drop several spoonfuls of raspberry sauce onto the batter. Using a fork or a knife swirl the sauce gently to distribute it throughout the cake. Be gentle and careful not to over-do it so you still have swirls and it doesn’t all blend together. When that is completed add the rest of the batter to the top of the cheesecake and repeat the raspberry swirling. You may not use all of your raspberry sauce and that’s okay. Just do it until it looks good to you and it will work out just fine.


Whew. I am getting tired. Are ya still with me!? You are almost done. Promise. The last step is baking. I don’t have lots of fancy equipment so I keep things pretty simple for my water bath and simply fill a half sheet pan with the hottest water from my tap. Then put the springform pan well-wrapped in tin foil (to avoid a soggy crust) in the pan. That’s it. See, it’s really not too complicated. Then bake for 60 minutes. When the cake is finished it should still have a slightly wobbly center, it will set up later so don’t worry. After the 60 minutes of baking is up I turn off the oven, crack open the door, and let it cool in the oven for about an hour. Then I move it to the fridge to finish cooling for at least 4 hours. The gradual cooling process again helps prevent cracking.

Alright, now your rich and creamy white chocolate raspberry cheesecake is FINALLY ready to devour. Doesn’t it look delicious!? Promise it’s worth the wait.


Do you have any cheesecake tips that I missed!? Or are you finally ready to take the plunge and try baking your first cheesecake!? I’d love to hear what you think, comment or message me your thoughts!

White Chocolate Raspberry Cheesecake
With a beautiful raspberry swirl, creamy white chocolate and a decadent chocolate cookie crust, you're sure to love this beautiful and festive dessert
Ingredients
Crust
- 24 Oreo Cookies, ~2 sleeves
- 4 Tbsp Butter, melted
Raspberry Sauce
- 2 Tbsp granulated sugar
- 1 Tbsp cornstarch
- 1/2 C cold water
- 12 oz fresh or frozen raspberries
Filling
- 24 ounces (3 packagecream cheese, softened
- 2/3 C sugar
- 1 Tbsp cornstarch
- 3 eggs +1 egg yolk
- 2 tsp vanilla extract
- Juice of 1/2 lemon
- 1/2 C Heavy Whipping Cream
- 1 1/2 C White Chocolate Chips
Instructions
- Preheat oven to 325 degrees.
Crust
- Wrap a 9 or 10-in Springform pan tightly with tin foil. Wrap it again for good measure. This will ensure no water gets in from the waterbath while you bake the cheesecake.
- Remove cream center from oreos and discard (or eat it up, I won't tell). Crush cookies in a food processor until fine.
- Add melted butter and pulse until well-blended. Push oreo mixture into the bottom of pan and set pan aside until ready to use.
Raspberry Sauce
- In a small saucepan whisk together corn starch and sugar. Add cold water and whisk until smooth. Add raspberries and cook over medium heat, stirring frequently, until the mixture reaches a boil. Continue to boil until the mixture thickens slightly and the raspberries deconstruct (5-7 min). Reduce heat if the mixture is splattering.
- Remove from heat and push sauce through a fine mesh strainer into a bowl to strain out the seeds. Set sauce aside until later.
Filling
- In a large mixing bowl beat cream cheese until smooth. Add granulated sugar and beat until smooth and fluffy.
- Add eggs one at a time, scraping down the sides and being careful not to overbeat.
- Add cornstarch, vanilla, lemon juice, and heavy cream. Set mixture aside.
- Melt white chocolate in the microwave at 50% power in a microwave safe bowl stirring after each time in the microwave. Add to the rest of the filling and blend until smooth.
Assembling your cheesecake
- Pour half of the cheesecake mixture into the oreo crush and spread evenly over the bottom. Drop ~2 tbsps raspberry sauce over mixture and swirl cheesecake with a fork or a knife. Add remaining batter on top and repeat with 2 more tbsps of raspberry sauce. You may not use all of your raspberry sauce. You may use more if desired or save it to use on pancakes or ice cream 🙂
Baking Your Cheesecake
- Put a half sheet pan on the top rack of your oven. Fill it with the hottest tap water you can get (I usually use a liquid measuring cup to do this).
- Put the cheesecake on the sheet pan and bake for ~60 minutes in a 325 degree oven. When the cheesecake is finished it should still jiggle slightly in the very center of the cheesecake.
- After the baking is complete, turn off the oven and leave it cracked slightly and allow the cheesecake to cool in the oven slowly for about an hour. Then transfer cheesecake to the refrigerator and cool for at least 4 more hours.

 ” />
” />


